Saturday, November 26, 2011
Friday, July 29, 2011
I would have taken pictures, but...
...the homemade bread I made this week is already gone! First I made a simple, nutty loaf with some whole wheat flour I wanted to try... Then, I made some amazing apple cinnamon challah bread - cinnamon-sugar-coated apples folded into a slightly sweet bread. Yum! (It's possible that I kind of just made the whole grain bread to balance that out....) Anyway, I thought I'd share the recipes with you all. They are easy, simple, and, well, there aren't many things more delicious than a slice of homemade, right-out-of-the-oven bread slathered with some butter! Oh, and I got the recipes from King Arthur Flour, where they have lots of great recipe ideas to choose from. I'm interested in trying the recipe for homemade pretzels!
Whole Wheat Nut & Seed Bread
- 1 1/3 cups (10 5/8 ounces) lukewarm water
- 3 tablespoons (1 1/4 ounces) olive oil
- 5 tablespoons (3 3/4 ounces) honey, molasses or maple syrup
- 4 cups (16 ounces) King Arthur Premium Whole Wheat Flour or 100% White Whole Wheat flour
- 1 tablespoon King Arthur Whole-Grain Bread Improver, optional
- 1/4 cup (1 1/4 ounces) sunflower seeds, chopped*
- 1/4 cup (1 ounce) walnuts, chopped*
- 1 1/2 teaspoons salt
- 2 1/2 teaspoons instant yeast
*A quick whirl in the food processor does the job nicely.
To prepare the dough: Combine all of the ingredients, and mix them till you have a shaggy dough. Let the dough rest, covered, for 20 minutes, then knead till fairly smooth. Allow the dough to rise, covered, for about 2 hours, or until it's puffy and nearly doubled in bulk.
Gently deflate the dough, shape it into a log, and place it in a lightly greased 8 1/2" x 4 1/2" bread pan. Cover the pan with lightly greased plastic wrap (or a clear shower cap), and allow it to rise for about 2 hours, till it's crowned about 1" to 2" over the rim of the pan.
Bake the bread in a preheated 350°F oven for 40 to 45 minutes, tenting it lightly with aluminum foil for the final 20 minutes of baking. Yield: 1 loaf.
Harvest Apple Challah
(This recipe is from King Arthur Flour - for this recipe, they include great pictures to go along with the instructions if you have trouble understanding them)
Dough
- 1/2 cup lukewarm water
- 6 tablespoons vegetable oil, safflower preferred
- 1/4 cup honey
- 2 large eggs
- 4 cups (17 ounces) King Arthur Unbleached All-Purpose Flour
- 1 1/2 teaspoons salt
- 1 tablespoon instant yeast
Apple filling
- 2 medium-to-large apples, NOT peeled; cored and diced in ¾" chunks
- 1/2 teaspoon ground cinnamon
- ¼ cup granulated sugar
Glaze
- 1 large egg beaten with 1 tablespoon water
- coarse white sugar, optional
Directions
1) To make the dough: Combine all of the dough ingredients and mix and knead them, by hand, mixer, or bread machine, until you have a soft, smooth dough.
2) Allow the dough to rise, covered, for 2 hours, or until it's puffy and nearly doubled in bulk. If you've made the dough in a bread machine, allow it to rise in the machine for an extra hour after the dough cycle is completed.
3) Lightly grease a 9" round cake pan that's at least 2" deep. Or grease a 9" or 10" springform pan.
4) Toss the apple chunks with the sugar and cinnamon.
5) Gently deflate the dough, transfer it to a lightly greased work surface, and flatten it into a rough rectangle, about 8" x 10".
6) Spread half the apple chunks in the center of the dough.
7) Fold a short edge of the dough over the apple to cover it, patting firmly to seal the apples and spread the dough a bit.
8) Spread the remaining apple atop the folded-over dough.
9) Cover the apples with the other side of the dough, again patting firmly. Basically, you've folded the dough like a letter, enclosing the apples inside.
10) Take a bench knife or a knife, or even a pair of scissors, and cut the apple-filled dough into 16 pieces. Cut in half, then each half in halves, etc. This will be very, VERY messy; the dough is slippery, apples will fall our, sugar syrup will ooze... it's not pretty. Don't worry, and don't stress about making all the pieces the same size.
11) Lay the dough chunks into the pan; crowd them so that they all fit in a single layer (barely). Lots of apple chunks will fall out during this process; just tuck them in among the dough pieces, or simply spread them on top.
12) Cover the challah gently with lightly greased plastic wrap or a proof cover, and allow it to rise for about 1 hour, until it's a generous 2" high. It should just crest the rim of a 9" round cake pan. Towards the end of the rising time, preheat the oven to 325°F.
13) Whisk together the egg and 1 tablespoon water. Brush the dough with the egg mixture, and sprinkle heavily with the coarse sugar, if desired. If you're going to drizzle with honey before serving, omit the sugar.
14) Place the bread in the lower third of the oven. Bake it for 55 minutes, or until the top is at least light brown all over, with no white spots. Some of the higher-rising pieces will actually char; that's OK.
15) Remove the challah from the oven, and after 5 minutes loosen the edges and carefully transfer it to a rack.
16) Serve the bread hot, warm, or at room temperature. Drizzle with honey just before serving, if desired; or serve with honey for dipping.
Sunday, July 17, 2011
Chocolate ♥

I love chocolate. With caramel, peanut butter, fruit... or more chocolate, it's the perfect addition to any sweet. The more chocolate, the better! For my fellow chocolate lovers, here are a few amazing recipes you simply must try...
Nestle Toll House Chewy Cocoa Brownies and Chocolate Lover's Frosting
(from verybestbaking.com)
So this first recipe is one I found a few years ago on the back of a box of cocoa. And since there was also a recipe for chocolate frosting after the brownie recipe, I decided to go ahead and make that too... more chocolate couldn't hurt. I thought they would be alright, but I was surprised at how amazing they really turned out to be. These brownies are dense, fudgy, and oh so chocolaty. You'll want to cut these small, though... (1) because they are very rich and (2) you won't feel quite so bad when you go back for more (and more, and...)
Brownies
Ingredients
1 2/3 cups granulated sugar
3/4 cup (1 1/2 sticks) butter or margarine, melted
2 tablespoons water
2 large eggs
2 teaspoons vanilla extract
1 1/3 cups all-purpose flour
3/4 cup Baking Cocoa
1/2 teaspoon baking powder
1/4 teaspoon salt
3/4 cup chopped nuts (optional)
Powdered sugar
Directions
Preheat oven to 350º F. Grease 13 x 9-inch baking pan.
Combine granulated sugar, butter and water in large bowl. Stir in eggs and vanilla extract. Combine flour, cocoa, baking powder and salt in medium bowl; stir into sugar mixture. Stir in nuts. Spread into prepared baking pan.
Bake for 18 to 25 minutes or until wooden pick inserted in center comes out slightly sticky. Cool completely in pan on wire rack. Sprinkle with powdered sugar. Cut into bars.
Frosting
Ingredients
3 cups sifted powdered sugar, divided
2/3 cup Baking Cocoa
1/2 cup (1 stick) butter or margarine, softened
5 to 6 tablespoons milk, divided
1 teaspoon vanilla extract
Directions
Beat 1 cup powdered sugar, cocoa, butter, 2 tablespoons milk and vanilla extract in small mixer bowl until creamy. Gradually beat in remaining sugar and milk until smooth. Makes 2 cups total.
Double Chocolate Peanut Butter Ice Cream (joythebaker.com)
For Mother's Day a few years ago, we got my mom an ice cream maker. It has been such a fun appliance to experiment with, and yesterday, I tried this recipe for one of my favorite flavors - chocolate peanut butter ice cream. It is so good! If you don't have an ice cream maker, Brown Eyed Baker has some instructions for how to make yummy ice cream without one.
Ingredients
2 1/2 cups whole milk
1 cup sugar
1/3 cup unsweetened cocoa powder
pinch of salt
3 Tablespoons cornstarch
1/2 cup heavy cream
3/4 cup semi sweet chocolate chips
1/2 cup smooth salted peanut butter ( I like the all natural peanut butter)
Directions
In a sauce pan over medium heat, stir together 2 cups whole milk, sugar, cocoa powder and salt. Heat until the milk start to steam, but before it starts to boil.
In a small bowl, stir together the remaining 1/2 cup of whole milk and the cornstarch. Stir until no lumps remain.
Add the cornstarch mixture to the heated milk and chocolate mixture and bring to a low boil. Boil until thickened. The mixture will look the consistency of chocolate pudding. Remove from flame.
In a small sauce pan, heat 1/2 cup of heavy cream. Once boiling, remove from heat and pour over the chocolate chips. Let sit for 1 minute, then stir the cream and chocolate mixture until incorporated.
Stir the cream and chocolate mixture into the cooling chocolate ice cream base. Place in a bowl, covered with plastic wrap or a lid, and put in the fridge until cool.
Once cool, follow the manufacturers instructions on the ice cream maker to churn ice cream. Once the mixture has chilled and thickened in the ice cream maker, slowly drizzle in 1/4 cup of peanut butter. Don’t over mix. You want a nice ribbon of peanut butter running through the ice cream.
Transfer the ice cream into a freezer safe container and fold in the remaining 1/4 cup of peanut butter. Cover and freeze until solid.
What is your favorite chocolate treat?
Wednesday, June 22, 2011
Deep-Dish Pizza Recipe

*gasp* A picture! For once, I am actually posting a picture of one of my recipes! It is a task which I had been
Although this picture doesn't do it justice, tonight I made Chicago-Style Deep-Dish Pizza from America's Test Kitchen (if you follow the link, all you have to do is enter your email to view some of the "free" recipes on their site... not many, but I think it's worth it!). The crust is flaky and buttery, the sauce is sweet and rich- the only thing I wasn't completely happy with about this recipe was the cheese. It wasn't exactly the texture I was looking for. But, the problem may have been that we didn't use whole milk mozzarella because we couldn't find it... I think it's possible that the whole milk cheese might have a more...cheesy texture?
Anyway, if you've enjoyed a Lou Malnati's deep-dish (or something similar), but don't live near a restaurant, this is a great, fun recipe to try. Just be sure to start early in the afternoon so you'll have enough time to let the dought rise (two 45 minute periods)!
What are your favorite pizza toppings?
Friday, June 10, 2011
Camping Themed Party
A camping themed cook-out is a great event to host on a budget - prepare simple food and use elements from the outdoors for decoration. Hold the party around the fire pit in your backyard, or at a park where one is available. Offer several different yard games to play and when it gets dark, play flashlight tag... or if your budget is a bit more generous, rent a projector and a screen and watch a movie outdoors.
Invitations
These tent invitations are pretty easy and straightforward. Inspired by this post that has lots of other great camping party ideas. You'll need:


Camping activities are fun and easy.
Food
Invitations
These tent invitations are pretty easy and straightforward. Inspired by this post that has lots of other great camping party ideas. You'll need:

- Two triangles of the same size (small enough to fit in the envelope you are sending the invitations in). One should be a patterned paper and one should be a light, solid color. (one of each for each invitation)
- Small rectangles of solid color paper cut with jagged edges (one for each invitation)
- Small letter stamps (I've seen sets before at Michael's craft store for $1 or so)
- Black stamp pad
- Small brads (one for each invitation)
- Small pieces of hemp or twine
- Scissors
- Adhesive of your choice

- First, stamp the letters you want on your "sign," the small rectangle of paper with jagged edges. You could stamp "A Party," "Camp-out," or the name of your party "camp" (e.g. Camp Sunshine).

- Next, poke two holes in the top edges of your sign and thread the short piece of hemp through the holes to form a hanging sign. Secure the sign with the brad to the patterned paper only.
- Once you have attached the sign to the front of the patterned paper, cut a slit down the middle of the triangle, almost reaching the sign. Fold back the sides of the paper to look like an open tent.
- Apply adhesive to the back of your patterned triangle, than line it up with the solid triangle and adhere. You may need to trim the edges of triangles if they don't line up perfectly.

- You're done! Sorry for the blurry picture... but I think you'll get the idea. Have fun with this invitation. Mix and match the papers, and don't worry about stamping the letters just right - it adds to the rustic camping look!


Camping activities are fun and easy.
- Go on a nature scavenger hunt, searching for items such as acorns, pine cones, and leaves. Whichever team collects the most items in the fastest amount of time wins. (Make sure all the items on your list are available in the area, and set boundaries for your guests' safety.)
- With the items from your scavenger hunt and some super glue, decorate bug habitats (like these ones) for take-home prizes. If lightning bugs are out, use the houses to collect them.
- Play Flash Light Tag, Capture the Flag, and other traditional outdoor games.
- Rent a projector and watch a movie under the stars.
Food
After roasting hot dogs over the fire, it's time to break out the marshmallows! Treat your guests to a S'mores Buffet, a fun twist on a classic treat. You can make your own graham crackers (healthier than store-bought and you can bake a variety of flavors like chocolate and cinnamon sugar).
Offer an assortment of chocolates such as milk, white, extra dark, and chocolate peanut butter cups.
You can also make your own marshmallows, using agave nectar instead of corn syrup. (I think it would also be fun to experiment with unique flavors like chocolate and salted caramel!)
If you like, you can also serve different fruits and nuts to top the s'mores. Guests will enjoy creating their own unique flavor combination. Chocolate peanut butter and dark chocolate coconut would be on the top of my list to try! Check out Birthday Girl's post for more S'more Buffet ideas. Using any ingredients, what s'more flavor would you create?
Favors
Send your guests home with "survival kits" (or hand them out at the beginning of the party). Fill inexpensive backpacks with fun and useful outdoor items such as granola bars, trail mix, glow sticks, flash lights, hand sanitizer, and other items you find at the dollar store.
Enjoy your camping party!
Thursday, June 9, 2011
Cooking
That's what I'll be doing this summer. Lots and lots of it. I love to do it. This week, I've cooked or baked something every day and I'm thinking I might make something else today. I can't get enough of it. I also want to keep a record of all the recipes I try here.
Unfortunately, this week, I don't have any pictures of the food... because I didn't get around to taking any and now most of the food is already gone. But in the future, I promise I will at least try to get a good picture. Anyway...
So, my goal is to cook dinner once a week for the summer. I started out this week with a challenge to put together a meal for $10 or less. I made it just within my budget, thanks to the fact that we already had some of the ingredients... hopefully as I go I will learn how to be a little more frugal.
First, I made Pioneer Woman's Restaurant Style Salsa.
Let me tell you, this stuff is amazing. The recipe uses canned tomatoes, but the fresh cilantro, jalapeño, onion, and garlic give it a homemade taste.
This recipe also makes a huge batch of salsa. About 6 cups. If you do the math, the cost of all the ingredients should technically be cheaper than jarred salsa (and way better). But... maybe not because it disappears twice as fast. ☺
Pioneer Woman's Restaurant Style Salsa
Pioneer Woman's Restaurant Style Salsa
Ingredients
1 can (28 Ounce) Whole Tomatoes With Juice
2 cans (10 Ounce) Rotel (diced Tomatoes And Green Chilies)
¼ cups Chopped Onion
1 clove Garlic, Minced
1 whole Jalapeno, Quartered And Sliced Thin
¼ teaspoons Sugar
¼ teaspoons Salt
¼ teaspoons Ground Cumin
½ cups Cilantro (more To Taste!)
½ whole Lime Juice
Preparation Instructions
Note: this is a very large batch. Recommend using a 12-cup food processor, or you can process the ingredients in batches and then mix everything together in a large mixing bowl.
Combine whole tomatoes, Rotel, onion, jalapeno, garlic, sugar, salt, cumin, lime juice, and cilantro in a blender or food processor. Pulse until you get the salsa to the consistency you’d like—I do about 10 to 15 pulses. Test seasonings with a tortilla chip and adjust as needed.
Refrigerate salsa for at least an hour. Serve with tortilla chips or cheese nachos.
______________________________________________________________
I also made Spicy Bean Burritos from Annie's Eats. Just a warning, this recipe uses chipotle in adobo sauce and the burritos really are spicy! Really! Although I am not a big fan of spicy foods, I love the sweet and smoky flavor that the chipotle adds to the bean mixture.
Spicy Bean Burritos
Yield: about 6 servings
Ingredients:
For the bean filling:
2 tsp. canola or vegetable oil
2 cloves garlic, minced or pressed
1 tsp. chili powder
1 tsp. minced chipotle in adobo sauce
1 tsp. ground cumin
¼ tsp. kosher salt
Dash cayenne pepper
1/3 cup water, vegetable broth or chicken broth
1 (15 oz.) can black beans, drained and rinsed
1 (15 oz.) can pinto beans, drained and rinsed
6 tbsp. fresh salsa
For serving:
6 (9- or 10-inch) flour tortillas, warmed
Shredded cheese
Diced tomatoes
Shredded romaine lettuce
Chopped green onions
Low-fat sour cream or Greek yogurt
Directions:
To make the bean filling, heat the oil in a skillet over medium-high heat. Add the garlic, chili powder, chipotle, cumin, salt and cayenne; stir, cooking just until fragrant, 30-60 seconds. Add the beans and the water or broth to the pan. Bring the mixture to a boil. Reduce the heat to medium-low and allow the mixture to simmer for 10 minutes. Remove the skillet from the heat, stir in the salsa and mash the mixture with a spoon or fork.
Spoon about a third of a cup of the bean mixture down the center of each tortilla. Top each serving with a pinch of shredded cheese, tomatoes, lettuce, green onions and sour cream.Roll the tortilla up tightly, burrito style, and serve immediately.
________________________________________________________________
Both of these recipes were easy and yum - I will almost definitely make both of them again. By the way, if you have never checked out Annie's Eats, do it now! It is a beautiful site and I have found plenty of great looking recipes that I want to try, including chicken gyros with homemade pita bread... in fact, I plan on making the Ginger Beef Stir Fry next week. And I will try to post at least one picture. ☺
Tuesday, March 8, 2011
Ladybug Party Ideas
Wow, it's been a while since I last posted... I guess it's been a busy start to the year. I will try to start posting more regularly again soon!! Meanwhile, enjoy some Ladybug Party ideas that I have been imagining up for a while... ☺


These bamboo butterfly nets can be purchased at Dollar Tree in an assortment of colors (including red, perfect for the classic ladybug theme!). They would make sweet, inexpensive favors - tying a piece of black and red polka dot ribbon with a "Thank You" tag around the handle would make them fit the theme even better!
Invitations

For one invitation, you'll need:
- One 4" circle of red paper
- One 4" circle of black paper
- One 2" circle of black paper
- One 3.5" circle of white paper (with party information printed/handwritten)
- Several 1" circles of black paper
- Two small black brads
- Adhesive
- Envelope for 4x6 note card
Instructions:
- Center white circle on 4" black circle and attach with adhesive.
- Attach 1" black circles to red circle with adhesive.
- Cut red circle in half.
- Lining up the two halves of your red circle on top of the 4" black circle, pierce brads through both circles.
- Attach the 2" black circle to the back of the 4" black circle with adhesive.
These invitations are super-easy to make and fit perfectly in a 4x6 envelope. I used my basic Cricut to cut out all my circles - I am convinced that although it is a big investment, the Cricut will actually help save money down the road that would otherwise have been spent on expensive punches. Especially because the kind I have comes with the "George Basic Shapes" cartridge. So go buy a Cricut. :)
Decorations
To save money (always a bonus) focus most of your decorations on one area (dessert table, etc.) instead of trying to lavishly decorate the entire party space.
My inspiration for a ladybug party started when I saw these adorable cupcake holders on sale at Wal-mart for $0.25 (yes, $0.25!!) each. (I just bought them Sunday - they might still have some left!) So, I bought two of them... and hopefully I'll have a use for them someday. For now, I'm just enjoying the fact that I got two cupcake holders for $0.50. :)

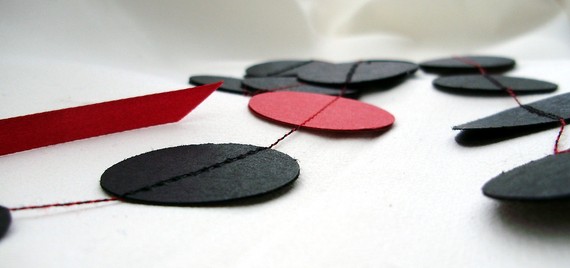
A simple red and black polka dot garland like this one would be simple to make and be a sweet touch to the front of a dessert table.
These ladybugs are cute and easy to make-

What you’ll need to make one:
- One red 2" circle
- One black 2" circle
- One black 1" circle
- Several tiny black circles made with a regular hole punch
- Adhesive
Instructions:
- Attach tiny black circles to red circle with adhesive.
- Cut small, triangular slit in the red circle.
- Attach the 2” black circle to the back of the red circle with adhesive.
- Attach the 1” black circle to the back of the 2” black circle.
These could be used to make a unique garland, as cupcake picks, or as embellishments on favor bags.


Lots of cute ladybug party decorations can be found on Amazon, including these sweet ladybug plates and red and black polka dot balloons.
The ladybug parties at Glorious Treats and Hissy Fits Photography also share some fun decorating ideas!
Activities

Image from Amazon.com
- Read Eric Carl's story, The Grouchy Ladybug.
- Bug jars! This Bug Jar Craft Kit from Oriental Trading (currently on clearance, $9.99 for 12 jars) comes with light plastic jars (with holes in the lids) and craft supplies to decorate the jars. (Customers on the site recommend that if the craft is being done with young children, the foam piece on the lid should be pre-attached so bugs can breathe!) After completing the craft, take your guests outside and let them explore for bugs - if the party is inside, or in an area where bugs are difficult to find, purchase plastic bugs and go on a bug scavenger hunt!
- Make these sweet ladybug puppets from the ladybug party on Glorious Treats.
- Ladybug, Ladybug, Fly Away Home (this idea is from Amazing Moms) - This is a variation of Musical Chairs. Before the party, cut leaves out of green construction paper. Place them all over the room where the game will be played (the number of leaves should be the number of players minus one). Instruct the players that when the music begins, the must dance (or fly) around the room. When the music stops, all the little ladybugs must find a leaf to land on. Whoever does not land on a leaf is either out of the game, or wins a small prize, depending on the age-range of the children playing.

- Adorable ladybug cookies (this could even be a party activity!).
- Simply bake cupcakes in the flavor of your choice, frost, then top with these sweet Ladybug Dec-Ons Candies.
- Bug juice!

These bamboo butterfly nets can be purchased at Dollar Tree in an assortment of colors (including red, perfect for the classic ladybug theme!). They would make sweet, inexpensive favors - tying a piece of black and red polka dot ribbon with a "Thank You" tag around the handle would make them fit the theme even better!
Subscribe to:
Posts (Atom)
